How To Build A Cold Frame To Start Your Seedlings
God knows I’m a complete punter when it comes to building anything in my workshop, but I’m even worse at growing things, so when there’s work to be done on the house or in the yard, I’m the guy that uses the power tool to build things or (intentionally) kill things. Given that our yard is in a state of flux right now (and by “flux” I mean “a muddy mess”) I’m mostly involved in the building infrastructure phase.
I’ve built a compost bin, about 4 foot square, which was quite a trick since I’m mostly dangerous to myself with power tools, and slightly dangerous to wood with them. I also built Sarah some raised beds for Sarah’s tiny industrial farm out back. She’s growing spinach, kale, broccoli, enormous leeks, peas, and garlic right now. Our haul is pretty impressive, and since she’s also an incredibly good cook, any effort I put into helping her with her garden is paid back tenfold.
So she described to me a tiny greenhouse like box called a “cold frame” that she would use to protect seedlings from the elements while they were sprouting. The cold frame is key to growing plants from seed, and she said you can save a lot of money by just buying the seeds and starting them. She added a couple of caveats for my hack construction of the box:
- it had to have a lid that opened;
- it had to be clear all around for maximum sunlight; and
- it couldn’t have a bottom, so she could put seeds in the ground and then just set the cold frame over them.
I thought about this for a while and stumbled across some Lexan at Home Depot. I chose the thick Lexan. Though it adds to the overall weight of the box, it will provide maximum insulation from the cold with minimal loss of incoming light.
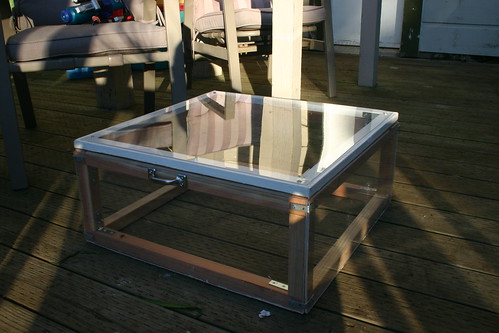
To build the cold frame, I started with some long redwood square pieces cut roughly 2 feet long. They’re eight feet long, and 1 3/4 inches square. I used redwood for the coldframe because it will weather well outside without needing to be treated. I made a square, cutting precisely by measuring twice and cutting once with a mitre box saw. I find that when I need precision, like I needed on the cold frame, cutting with the mitre box saw eliminates most of the errors I usually induce just using my hand saw. When you’re making something where the edges have to be square, getting it right by 1/8th of an inch is a requirement.
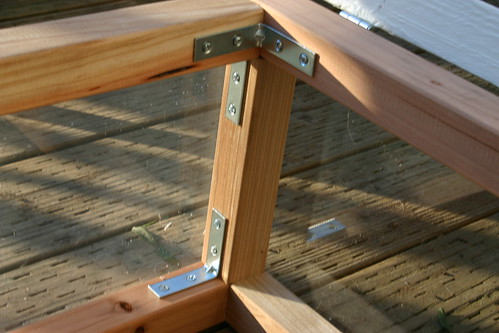
I build the square frame top and the bottom with L-brackets on the inside edges. Then I cut four 7
inch pieces and used them for the supports in between, making the cold frame 2 feet by 2 feet by 10.5 inches.
Having previously obtained the Lexan for the side and top windows of the coldframe, I cut it to size using my Dremel with a diamond cutting wheel. When you use the Dremel to cut something like this, you have to be careful and wear safety glasses. The speed of the Dremel generates heat, which melts the plastic as it cuts. The result is flying bits of molten plastic, and let me tell you, it’s not good to get that in your eye. Even with lab glasses on and my own glasses underneath, I still felt somethiing get in through the air vents. It wasn’t until I managed to learn the trick of running the Dremel away from me as I cut, instead of towards me, that I stopped getting a face full of molten polycarbonate.
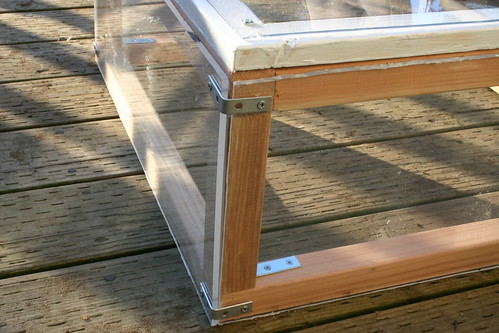
So once you have these cut you need to attach them to the sides of the cold frame. I used, wait for it…. L BRACKETS! Seriously, I’m a one technique sort of guy. It wasn’t difficult and I used longer than normal screws to put them through the Lexan all the way into the wood. If I’d done a little more research I might have chosen to use deck screws that won’t rust, since the cold frame will be sitting outdoors most of the time. Live and learn.
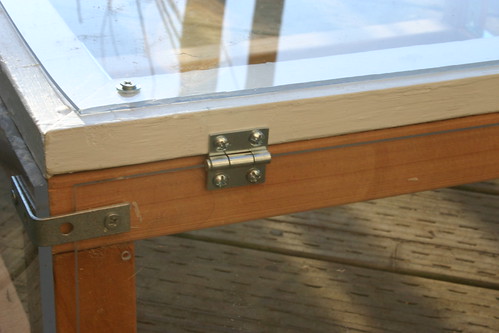
The top was a little more challenging. I had some hinges chosen, but I worried that if I attached them to the Lexan it would just cause the Lexan to break, so I had to come up with something else. I ended up building a wood frame for the top, using non-redwood 1″x1 3/4″ pine. Since I didn’t have redwood laying around, I went ahead and primed it, which was a project Moishe helped with. Nothing like a painting project to thrill a three year old.
After making 45 degree cuts on the edges and assembling it with L BRACKETS (hahaha) I just attached
the Lexan to the top with screws and washers. I hinged the top to the frame and added a couple of handles to the sides and voila, I was done.
You can see the cold frame in the attached Flickr set the cold frame from a couple of different angles. If you’re going to attempt this yourself, you’ll need the following materials for the cold frame:
- 12 feet of redwood, 1 3/4″ square
- 8 feet of 1″x1 3/4″ pine
- a million L Brackets (well, more like 28)
- 2 small hinges
- 2 handles
The tools for building your cold frame (and I recommend for your workshop):
- A mitre box saw. Seriously, you need the precision it offers vs. that free hand cutting thing you’ve been doing.
- 2 clamps with soft surfaces so you don’t crack the Lexan during assembly
- A Dremel multi tool with a diamond cutting wheel
- A good collection of screws (though your L brackets will come with them).


Remember that the inside of that frame is going to be moist due to condensation, so you might want to unscrew those interior l-brackets, put some caulk behind them, and screw them back in…
Otherwise the water will seep down in the screw holes and rot them loose.
And if there are stainless and/or zinc coated versions of the brackets/screws, that will last longer, too.